
Getting Started with Events
Overview
The events system is a way for integration developers to subscribe to certain kinds of actions or changes within Benchling. This can usually be accomplished by polling the relevant API endpoint and looking for changes, but events provide a much cleaner, easier, and faster way to accomplish this. Using events, integrations can be triggered from changes in Benchling to accomplish follow on actions such as:
- Automatically creating objects for the next step in a user workflow
- Adding extra metadata
- Automating instrument interaction
- Syncing changes to an external database
- Notification in a 3rd party application
Events can be delivered to an integration in two ways: Webhooks for events delivered to apps via HTTP, and Amazon EventBridge** for events delivered to integrations via event bus.
Events are most powerful when paired with Benchling's REST API to create event-driven integrations. A typical event-driven architecture might look like this:

What events are available?The Events Reference doc has a full list of events that are available. Additionally, the Webhooks Reference documentation includes the full specification of all events, as well as the specification for webhook-specific details.
Subscribing to Events
Benchling currently supports two distinct even delivery methods:
- Webhooks - An HTTP request with the event payload is sent to a webhook URL provided by the app developer.
- AWS Eventbridge - Benchling sends the event payload to an Eventbridge bus that is configured and owned by the customer.
The delivery method determines how you subscribe to events, what the event payload look like, and which events you can receive. The following table describes the differences between delivery methods:
| Criteria | AWS EventBridge | Webhooks |
|---|---|---|
| Available events | alpha, beta, and stable Events for V2 APIs | stable Events for V2 APIs, as well as App signal events |
| Payload shape | Hydrated payload (i.e. identical to corresponding V2 API endpoint) | Thin payload (i.e. ids, event type, timestamps) |
| Subscription mechanism | Setup in Benchling developer console + Event bus on AWS | Setup in Benchling App |
| Permissions | Not permissioned | Permissions inherited from app |
| Filtering | Filters can be configured in EventBrdige | Filters can be configured in app code |
In general, we recommend using Webhooks for event delivery. Webhooks provide easier setup, better security, and faster access to new event types.
Receiving Events via Webhooks
Two things are required to receive Events via webhooks:
- A Benchling App
- A public HTTPS endpoint
More info on creating Benchling apps can be found in our Getting Started with Benchling Apps guide. With these two pieces in place, continue to our Getting Started with Webhooks guide for a complete walkthrough.
Receiving Events via EventBridge
Subscribing to Events via EventBridge is a bit more involved, and requires configuration in both Benchling and your AWS account. Here, we'll cover the details of setting up your Benchling tenant for event delivery via EventBridge, as well as some high-level details on how to configure your AWS account. For more detail on the AWS setup, check out the EventBridge documentation.
Setting up a subscription
To set up a subscription, go to https://<YOUR_TENANT>.benchling.com/event-subscriptions, or you can access them by going to the settings menu > Feature settings > Developer Console, which takes you to the Events page:

Developer Console Settings
Tenant Admin RequiredEvents configuration is only accessible to Tenant Admins with the Developer Platform capability.
If the page does not work for you, or if the "Developer Console" option is not available under "Feature Settings", ask the Benchling team to enable events for your tenant.
To create a subscription, click the “+” button, which should open the following modal:
You will need the following information to create an Amazon Eventbridge subscription:
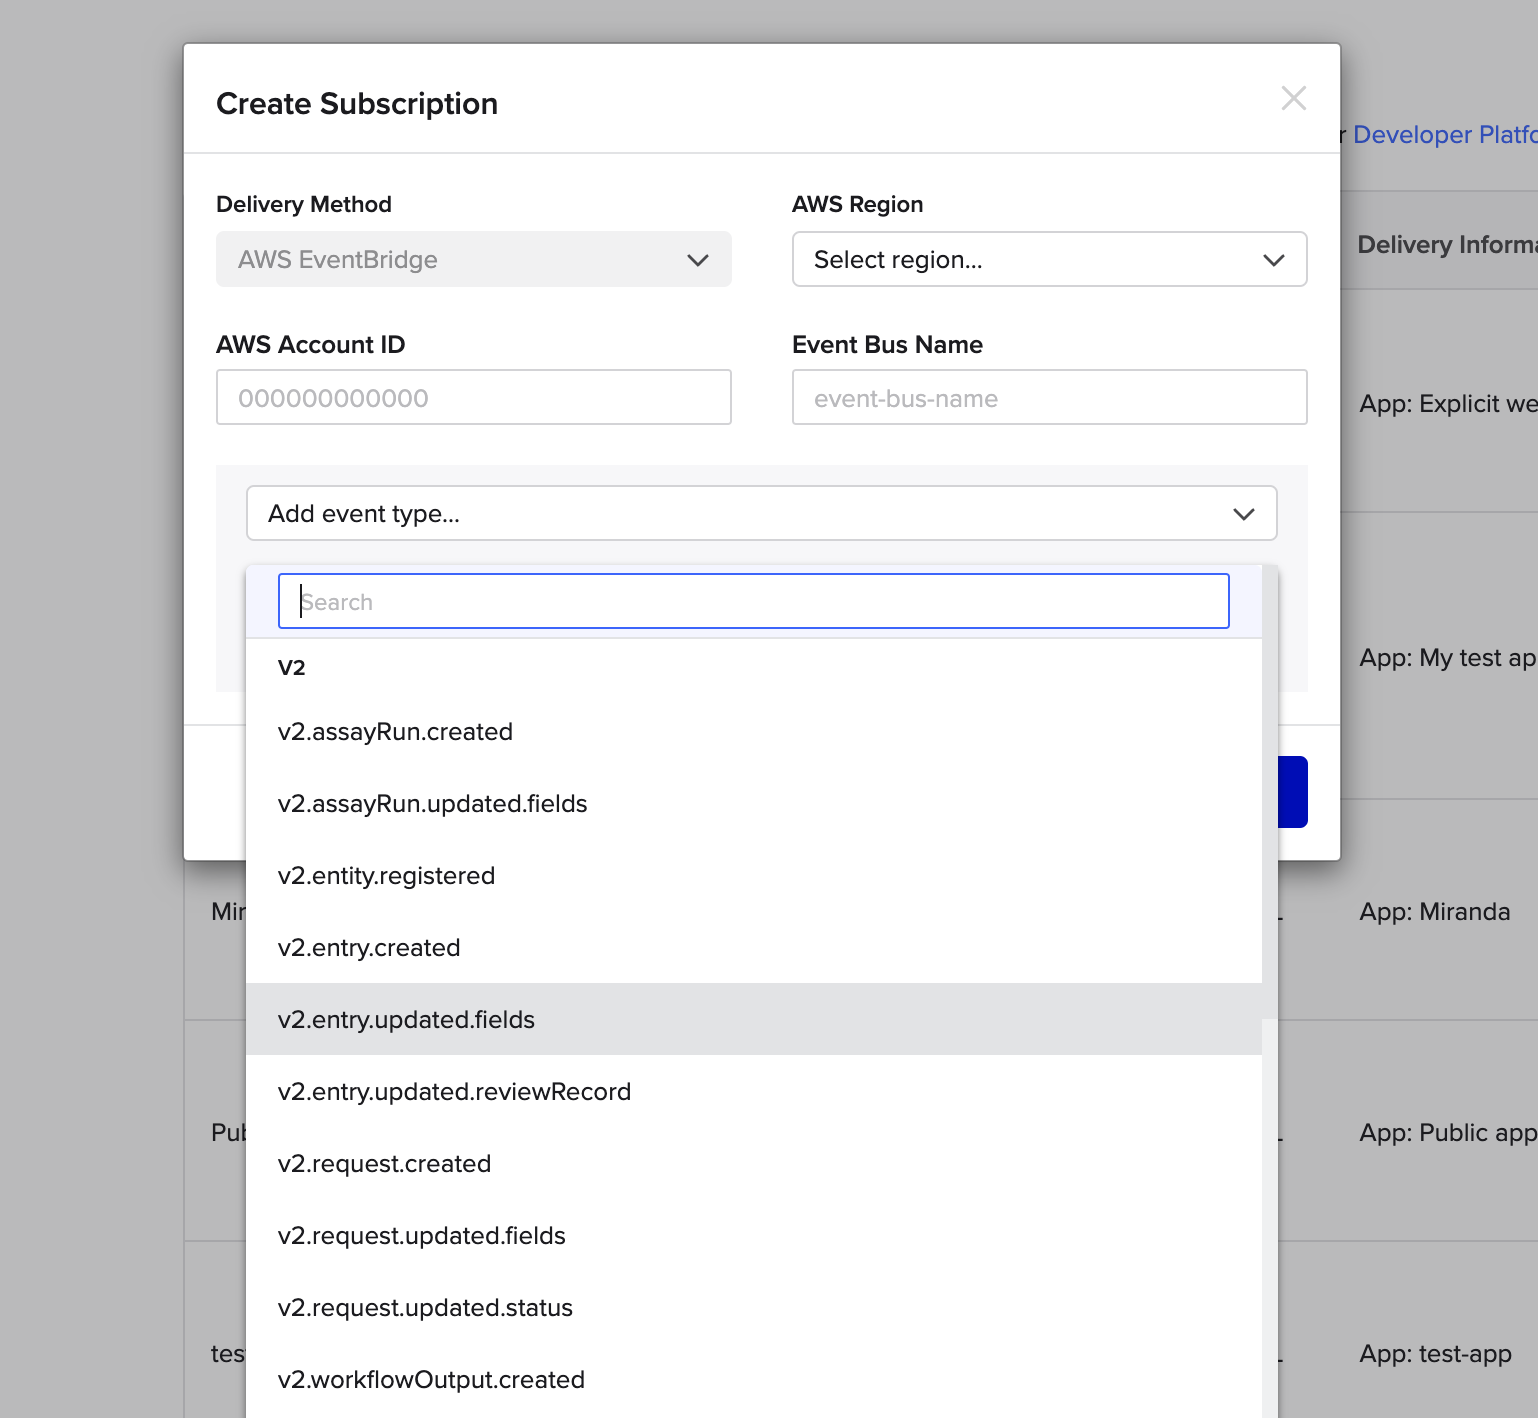
Event Subscription Modal
- AWS Account ID (e.g. 12345689123)
- Region (e.g. us-west-2): Region that you want to process events in
- Event Bus Name (sequence-integrations): The name of your event bus in AWS
- Event Types: List of event types to subscribe to, see the Event Reference Docs
Setting up a subscription will create a partner event source in the provided AWS account in the provided region.
Setting Up SubscriptionsYou must set up one event subscription per account/region even if you plan on building several integrations. You can create multiple rules in EventBridge to route different sets of events to each of your integrations.
As soon as you have created a new event subscription in Benchling, you should follow the steps below to create an event bus off of the Partner Event Source that was created in your account.
Automatic Partner Event Source DeletionYou must create an event bus in AWS immediately after setting up your subscription in Benchling. If you do not do so, AWS will automatically delete the Partner Event Source if it goes unused and you will be unable to associate it with your event bus. You must then wait for Benchling support to manually delete your original subscription. Please follow the next steps inReceiving Events immediately.
Receiving Events
This section walks you through how to receive events through Amazon EventBridge.
AWS WalkthroughThe rest of this document is a walkthrough of how to set up your AWS infrastructure to receive and act on events. Is it not unique to Benchling or required to be completed exactly in this way, but rather serves as a guide for those unfamiliar with the AWS components involved. Please feel free to use whatever process makes the most sense for your environment.
Creating a Bus
Once you receive a partner event source, you will need to associate it with a new bus. Partner Event Sources and buses are 1-1. This means that for each source set up by Benchling, there will need to be a unique bus associated with it. In addition to being required by AWS, this has the effect of ensuring events from different tenants (e.g. dev, test, prod) never end up on the same bus and can be routed to completely separate processing pipelines from the very beginning.
We recommend that this step be completed manually in the AWS Console as soon as each event subscription is created in Benchling.
Once the source exists, you will see a screen like this:

When you click on “Associate with event bus,” you will be guided through creating a new bus for this source. Notice the status of this source says “Pending.” Partner event sources remain in a “Pending” state until they are associated with a bus. If the bus they are associated with is deleted, they enter a “Deleted” status and must be re-instantiated in Benchling.

Even though this event bus will be receiving events from Benchling’s AWS account, there is no need to check either “Other AWS account” or “Organization” under “Permissions.” These permissions only apply if you want to route Benchling events to other accounts.
Once you’ve created a bus and associated it with a source, you’re ready to configure rules and targets to receive events.
Rules and Targets
In order to trigger anything from an event, an Events Rule is required. This resource describes how AWS should trigger other resources based on which events arrive. If you use Cloudformation, this will be a resource with Type: AWS::Events::Rule. The Events Rule resource has four essential parts:
-
EventPattern - The Event Pattern is how AWS will identify which events this rule acts on. It can contain up to three sub-keys, each of which are lists and match if any element in the list matches an event at that key. The Events Rule is only triggered if all sub-keys inside Event Pattern are satisfied. Specifying fewer sub-keys will result in more lenient matches (it’s like saying "*" for that key). The sub-keys possible are:
-
source: This matches the "source" key at the top level of an event. This should correspond to the partner event source, like: aws.partner/benchling.com/mycoolintegration/some-integration-name. Because buses and partner event sources are 1-1, specifying a source is not necessary. There will only be one source per bus.
-
detail-type: Matches the "detail-type" key at the top level of an event. This key corresponds to the type of event. For example, if we want to see every request created, we would specify
["v2.request.created"] -
detail: Allows you to specify specific key-value combinations inside the "detail" section of the event. The value for this can have a nested structure and allows for pretty arbitrary specification. This would be where we match something like:
{"schema": {"name": ["Vector Production Request"]}}. -
Example Event Patterns:
-
Filtering by updates to my_field:
{ "detail-type": ["v2.assayRun.updated"], "detail": { "updates": { ["my_field"] } } } -
Filtering by schema type:
{ "detail-type": ["v2.entity.registered"], "detail": { "entity": { "schema": { “id” : { ["My_Schema_ID"] } } } } }
-
-
-
EventBusName - The name of the event bus to use for this rule. Should have the same name as the partner event source created by Benchling.
-
Targets - This is what AWS will do with an event once it finds a match. It’s important to note here that there are multiple targets allowed. So your integration could conceivably trigger multiple actions per event. This has the potential to be exceptionally useful for applications like logging/aggregation/monitoring, or triggering lambdas with different independent actions. The caveat here though is that changing the EventPattern will result in all targets receiving different events. In addition, there is no reason a target must be a lambda. It is potentially useful to use an SQS queue or SNS topic as the target of an EventRule to take advantage of built in dead letter queue properties or broadcast abilities of those AWS resources. Each target must have:
- Arn: AWS resource identifier (should be simple to provide)
- Id: Needs to be a unique string to identify that target.
-
State - Can either be ENABLED or DISABLED if DISABLED, the rule will be created, but no events will be passed to Targets until it is re-enabled.
It is possible to do much fancier things with Events rules like transforming input for each target or scheduling events to pass, but this describes the minimal set. More documentation can be found at https://docs.aws.amazon.com/AWSCloudFormation/latest/UserGuide/aws-properties-events-rule-target.html.
Invoke PermissionsIn addition to a rule, you will need to grant
AWS::EventBridgepermission to route messages to the targets of the event rule. There are different types of invoke permissions for different types of targets. For example, to invoke a lambda you need to create a resource of typeAWS::Lambda::Permission. To put events on an SQS queue you will need to create anAWS::SQS::QueuePolicy.
Setting up Cloudwatch Monitoring
As a best practice, we recommend setting up monitoring in order to have visibility into the events that flow in through your event bus from Benchling. A quick way to do this is with AWS' Cloudwatch Logs, by attaching to your event bus an Events Rule that targets a Cloudwatch log group. With this type of rule set up, any event coming over the bus that matches the rule will be logged to the log group, which can then be inspected (e.g. when debugging or when sanity checking that the event bus was set up properly).
In order to create a general purpose log group that logs all events that come through the bus, you'll need to create a rule whose Event Pattern matches every event (see the Rules and Targets section for details on creating a rule using a custom Event Pattern). For this use case, we therefore recommend using the source field of the event payload, which is a static field on every event payload that matches the name of the event bus over which it came. You can find the exact source name for your event bus in the Benchling Events developer console at https://<your_tenant>.benchling.com/event-subscriptions, under the "Subscription" column.
When creating a rule with an Event Pattern to match your bus' source, the pattern will simply map the "source" field to the event bus name:

Then, add a Cloudwatch log group as a target for the rule. You can either create a new log group or choose from an existing one:

Once the rule is created, all events coming through the bus will be logged to your selected log group.
Cloudformation Examples
You can also manage integrations that receive events using AWS SAM. SAM is a way of bundling related resources together as a Cloudformation Stack. This allows us to specify several related resources at once in a declarative structure. For more information on SAM, please refer to https://aws.amazon.com/serverless/sam/
Why SAM?We recommend using AWS SAM or some other form of "infrastructure as code" as it aligns with best practices for this type of infrastructure management and deployment. For instance, if you are using a dev and prod environment, it makes it easily reproducible. There is nothing specific to SAM that is required to use Events with Benchling.
This section contains a few starter templates for getting Benchling events into commonly used AWS resources. These templates can be extended to include more resources or modified to pass different event types or more specific events.
Put Entity Registered Events on an SQS Queue
This stack routes all messages with type entity.registered to an SQS Queue named BenchlingEntityRegisteredQueue. The queue can be configured with a redrive policy or used to trigger a lambda, etc as desired. Note that to deploy this stack, you would need to specify the name of the event bus via the BenchlingEventBusName parameter using --parameter-overrides when calling sam deploy.
AWSTemplateFormatVersion: "2010-09-09"
Description: Benchling Events Demo
Parameters:
    BenchlingEventBusName:
        Type: String
Resources:
    EventSQSRule:
        Type: AWS::Events::Rule
        Properties:
            EventBusName: !Ref BenchlingEventBusName
            Description: "Forward Benchling Event to SQS"
            Name: !Sub TemplatePlasmidToSQS-${AWS::StackName}
            EventPattern:
                detail-type:
                    - "v2.entity.registered"
            State: "ENABLED"
            Targets:
                - Arn: !GetAtt BenchlingEntityRegisteredQueue.Arn
                  Id: !Sub "BenchlingEntityRegisteredQueue-${AWS::StackName}"
    EventSQSPolicy:
        Type: AWS::SQS::QueuePolicy
        Properties:
            PolicyDocument:
                Statement:
                    - Effect: Allow
                      Principal:
                        Service: events.amazonaws.com
                      Action: 'sqs:SendMessage'
                      Resource: !GetAtt BenchlingEntityRegisteredQueue.Arn
            Queues:
                - !Ref BenchlingEntityRegisteredQueue

    BenchlingEntityRegisteredQueue:
        Type: AWS::SQS::Queue
        Properties:
            QueueName: BenchlingEntityRegisteredQueue
            MessageRetentionPeriod: 1209600 # 14 Days (max)
            VisibilityTimeout: 60
Triggering a Lambda when a request is created:
This template defines a stack that creates a lambda to be triggered whenever an event with the type request.created is put on the bus. This stack is very similar to the one before. We specify three resources, the rule, the target, and the permissions resource for EventBridge to interact with the target defined in the template.
Notice here that we don’t need any intermediate resources. AWS EventBridge can trigger a lambda directly from the EventsRule. In addition, we can configure a lambda with a DeadLetterQueue property to route any events it fails to process to an SQS or SNS topic.
AWSTemplateFormatVersion: "2010-09-09"
Transform: AWS::Serverless-2016-10-31
Description: "Sample Integration for Events"
Parameters:
  BenchlingEventBusName:
    Description: "Event Bus used to trigger lambdas"
    Type: String

Resources:
    LambdaEventRule:
        Type: AWS::Events::Rule
        Properties:
            EventBusName: !Ref BenchlingEventBusName
            Description: "Forward Benchling Event to Lambda"
            Name: !Sub TemplatePlasmidToLambda-${AWS::StackName}
            EventPattern:
                detail-type:
                    - "v2.request.created"
                detail:
                    schema:
                        name:
                            - "Validated Request"

            State: "ENABLED"
            Targets:
                - Arn: !GetAtt HandleEventLambda.Arn
                  Id: !Sub "HandleEventLambda-${AWS::StackName}"

  LambdaInvokePermissionForEvents:
    Type: AWS::Lambda::Permission
    Properties:
      FunctionName:
        Ref: "HandleEventLambda"
      Action: "lambda:InvokeFunction"
      Principal: "events.amazonaws.com"
      SourceArn:
        Fn::GetAtt:
          - "LambdaEventRule"
          - "Arn"

  HandleEventLambda:
    Type: AWS::Serverless::Function
    Properties:
      Timeout: 10 # Seconds
      MemorySize: 128
      ReservedConcurrentExecutions: 1
      Runtime: python3.7
      CodeUri: src/
      Handler: main.lambda_handler
Unsubscribing from Events
Like creating subscriptions, unsubscribing from certain event types differs based on delivery method:
Unsubscribing from Webhook Subscriptions
Unsubscribing from specific event types requires updating your app to remove the event type from your subscriptions. The new version of the app can then be shared and upgraded from the app workspace of your tenant (and any other tenant where the app is installed)
Note: You will continue receiving webhooks as long as any tenant has a version of the app with that subscription.
To disable all webhook subscriptions, an installing tenant (not necessarily the app owner) can archive the app(s) that are receiving webhooks. This will disable all event delivery for the app(s) in question.
Unsubscribing to EventBridge Subscriptions
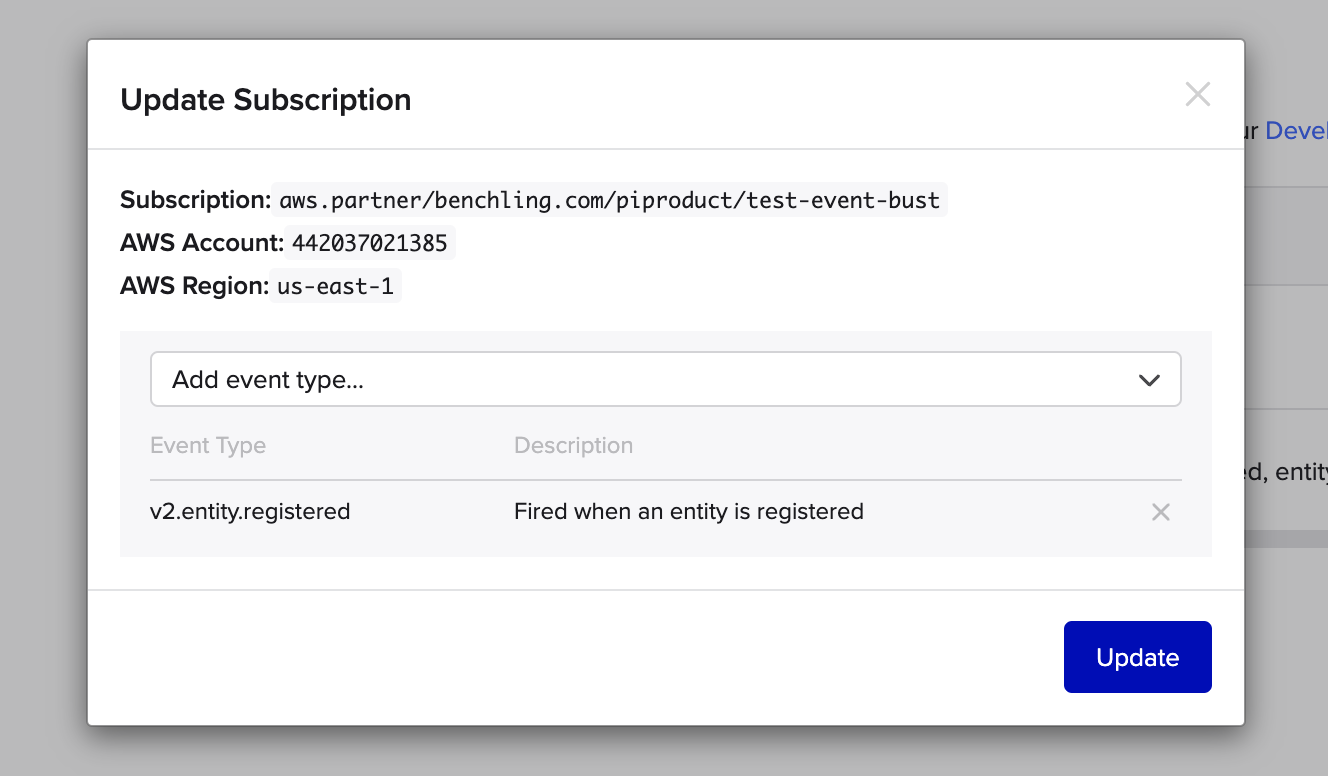
To unsubscribe from specific events, Go to Feature Settings > Developer Console > Events and click on the subscription you wish to modify. Click the “X” icon next to any event type you wish to unsubscribe from and click “Update” to confirm:
To disable all EventBridge subscriptions, navigate to Feature Settings > Developer Console > Events, click the trash can icon next to the subscription you wish to remove. Then, log into your AWS Eventbridge console and deactivate the corresponding event bus from there.
Updated over 1 year ago