Workflow Integrations with Ordering Systems
Introduction
Transaction of data to and from Benchling is a common need amongst Benchling customers. Given scientific processes are often mapped out in Benchling Notebook Entry Templates, the registration of sample and inventory data makes Benchling an appropriate kicking off point for CRO orders or internal request management systems. Integrations through Workflows help prevent the need for duplicating data entry across these
3rd party systems.
Definitions
| Term | Definition |
|---|---|
| Benchling App | Deployed code that is developed using a framework provided by the Benchling platform to define, manage and permission custom integrations and extensions. |
| Benchling API | The Benchling application programming interface that can be used to programmatically interact with data schemas to query, create, modify and archive entities |
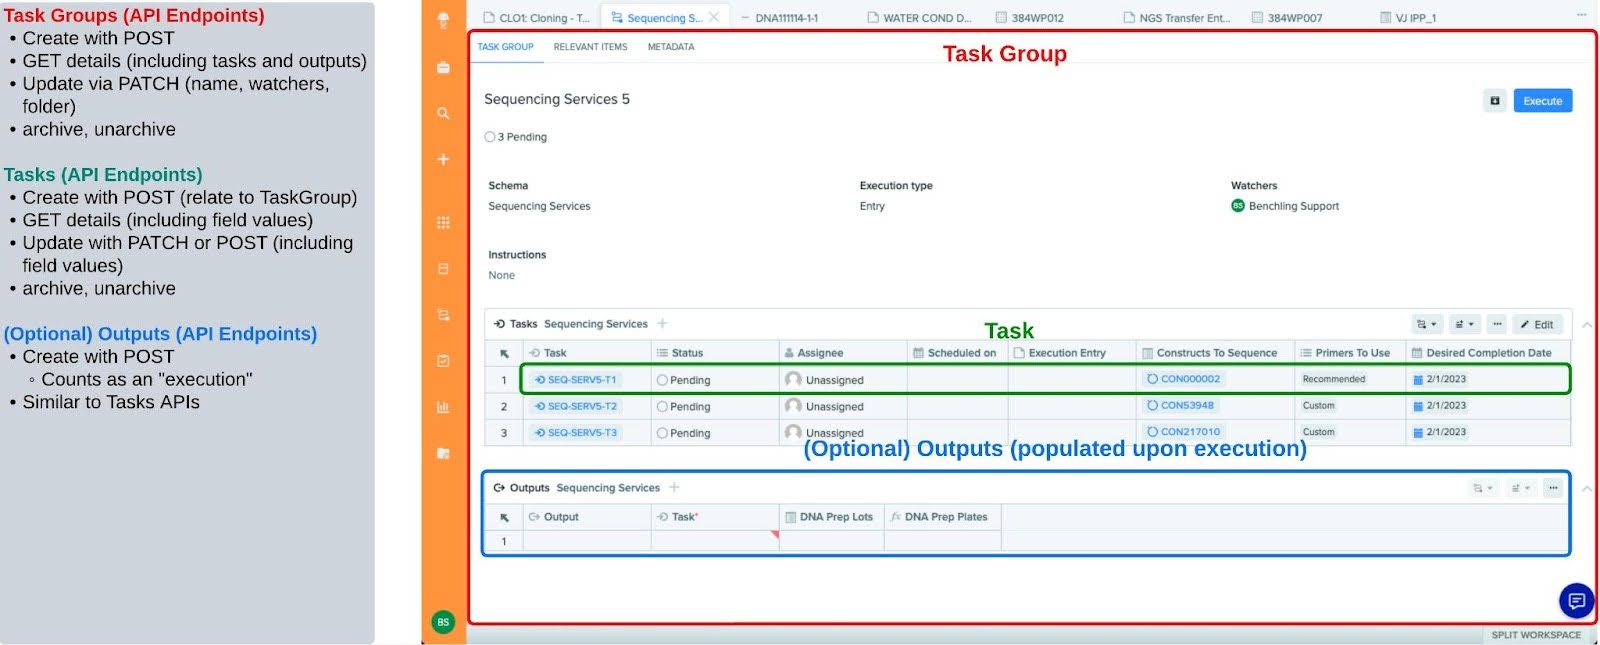
| Workflows | The Benchling application that is leveraged for managing requests and linking steps of a process within the platform |
| Workflow Task | A representation of a job to perform in a process or workflow. Each task has standard operational properties and custom fields that represent the parameters required to execute the job. |
| Workflow Flowchart | A set of ordered tasks that are created together from the same schema that encompass a complete process. |
Required Benchling Applications
This technical accelerator relies on the following Benchling products:
-
Benchling Workflows
-
Benchling Apps
-
Benchling API/SDK
Scope
Workflows is one of Benchling's applications that can be leveraged to expand upon out-of-the-box Benchling functionality and support a wide variety of integration use cases. From building scientific processes with embedded business logic to integrating with ordering applications or transactions from an external platform, Workflows has the flexibility along with the toolkit of Events and REST API endpoints to support your build and design.
In this Technical Accelerator, we will be modeling an ordering transaction that leverages sample and inventory data that can be initiated by event triggers available within the Benchling platform. Without this level of integration, users are often found manually inputting data into ordering systems for the purposes of gene synthesis, sequencing, or in vivo experiments. . The main concepts of this Technical Accelerator can be expanded upon to support a multitude of integration use cases.
The information in this document is intended to provide a general overview of an ordering engagement between Benchling and a third-party website or CRO using the Benchling developer platform. Ordering requirements and outputs can vary significantly based on requirements. Benchling's Technical Solutions team is available to discuss alternative solutions.
Not covered:
Due to the flexible nature of Workflows, this Technical Accelerator does not cover the pros and cons of leveraging a Workflow Flowchart vs. an individual Workflow Task for your integration needs. It also does not highlight how best to incorporate business logic between each step within an integrated process.
Additionally, Benchling Workflows are limited to 500 rows per Task table, so projects that exceed 500 rows of objects are not recommended to be purely solutioned through Workflows tasks.
High Level Integration Diagram

Please refer to a breakdown of the Workflow API below:

Step By Step Explanation
Submitting an order based on data in Benchling
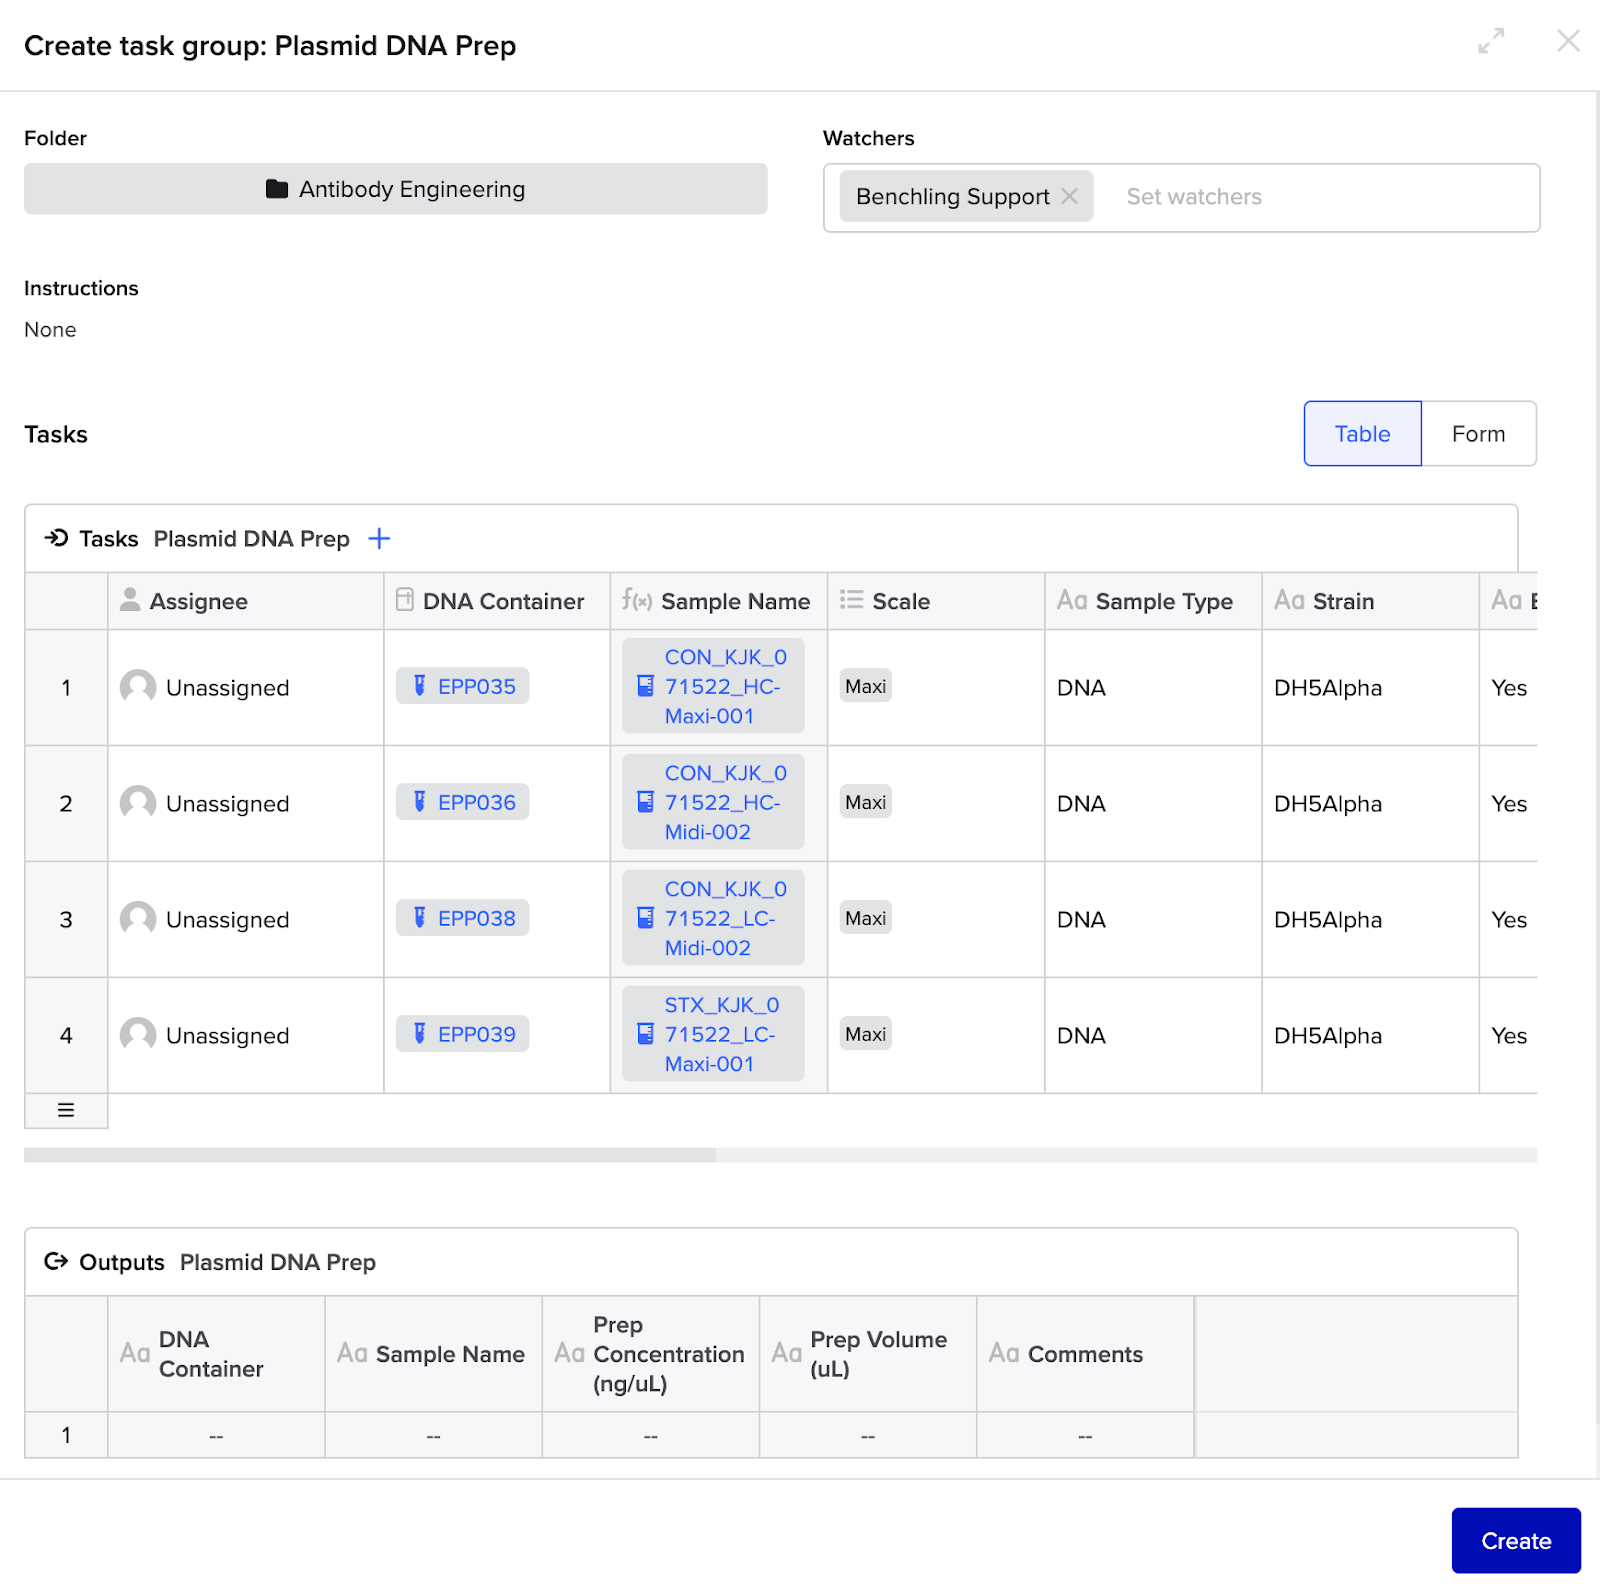
This integration will be driven through the use of a configured Benchling Workflow Task. In this particular Plasmid DNA Prep, the order keys off of pre-existing DNA containers. Given the structure of the order is captured in a Task, there is flexibility to plug this Workflow Task into any appropriate Workflow Flowchart.
Inputs
In order to generate the submission successfully, the following set of order parameters would be captured in the initial Workflow Task group table:

Delivery
- After inputting the appropriate parameters, the user clicks "Create" on the Workflow Task.
Processing
-
The integration should receive an event payload from a Benchling v2.workflowTask.created event.
- Note: leveraging Events will constitute the need to manage a queueing system (e.g. SQS) that can batch process workflow events that are part of the same Task Group.
-
The integration should pull the Workflow Task payload (see below) which includes the fields' values. In the example below, we see the fields' values as Antibiotic, Comments, Copy Number, etc which would be provided to the 3rd party platform.
-
The integration pushes the appropriate data to the 3rd party service.
{
  "archiveRecord": null,
  "assignee": null,
  "clonedFrom": null,
  "creationOrigin": {
    "application": "PROCESSES",
    "originId": "prs_zlESnfVA",
    "originModalUuid": null,
    "originType": "PROCESS"
  },
  "creator": {
    "handle": "benchlingsupport",
    "id": "string",
    "name": "Benchling Support"
  },
  "displayId": "PDP1-T1",
  "executionOrigin": null,
  "executionType": "DIRECT",
  "fields": {
    "Antibiotic": {
      "displayValue": "Kanamycin",
      "isMulti": false,
      "textValue": "Kanamycin",
      "type": "text",
      "value": "Kanamycin"
    },
    "Comments": {
      "displayValue": "None",
      "isMulti": false,
      "textValue": "None",
      "type": "long_text",
      "value": "None"
    },
    "Copy Number": {
      "displayValue": "High",
      "isMulti": false,
      "textValue": "High",
      "type": "text",
      "value": "High"
    },
    "DNA Container(s)": {
      "displayValue": "EPP035",
      "isMulti": false,
      "textValue": "EPP035",
      "type": "storage_link",
      "value": "con_0w1S2vHM"
    },
    "Endotoxin Free": {
      "displayValue": "Yes",
      "isMulti": false,
      "textValue": "Yes",
      "type": "text",
      "value": "Yes"
    },
    "Final Buffer": {
      "displayValue": "TE",
      "isMulti": false,
      "textValue": "TE",
      "type": "text",
      "value": "TE"
    },
    "Glycerol Stock": {
      "displayValue": "No",
      "isMulti": false,
      "textValue": "No",
      "type": "text",
      "value": "No"
    },
    "Plasmid Size (bp)": {
      "displayValue": "3812",
      "isMulti": false,
      "textValue": "3812",
      "type": "integer",
      "value": 3812
    },
    "Sample Name": {
      "displayValue": "CON_KJK_071522_HC-Maxi-001",
      "isMulti": false,
      "textValue": "CON_KJK_071522_HC-Maxi-001",
      "type": "entity_link",
      "value": "bfi_lws5G5Fo"
    },
    "Sample Type": {
      "displayValue": "DNA",
      "isMulti": false,
      "textValue": "DNA",
      "type": "text",
      "value": "DNA"
    },
    "Scale": {
      "displayValue": "Maxi",
      "isMulti": false,
      "textValue": "Maxi",
      "type": "dropdown",
      "value": "sfso_QcW9pVrh"
    },
    "Strain": {
      "displayValue": "DH5Alpha",
      "isMulti": false,
      "textValue": "DH5Alpha",
      "type": "text",
      "value": "DH5Alpha"
    }
  },
  "id": "wftask_eCV8IjPr",
  "scheduledOn": null,
  "schema": {
    "id": "prstsch_wXlmeZmx",
    "name": "Plasmid DNA Prep"
  },
  "status": {
    "displayName": "Pending",
    "id": "wfts_1Ezgw7t4",
    "statusType": "PENDING"
  },
  "workflowOutputs": [],
  "workflowTaskGroup": {
    "displayId": "PDP1",
    "id": "prs_zlESnfVA",
    "name": "Plasmid DNA Prep 1"
  }
}
Outputs
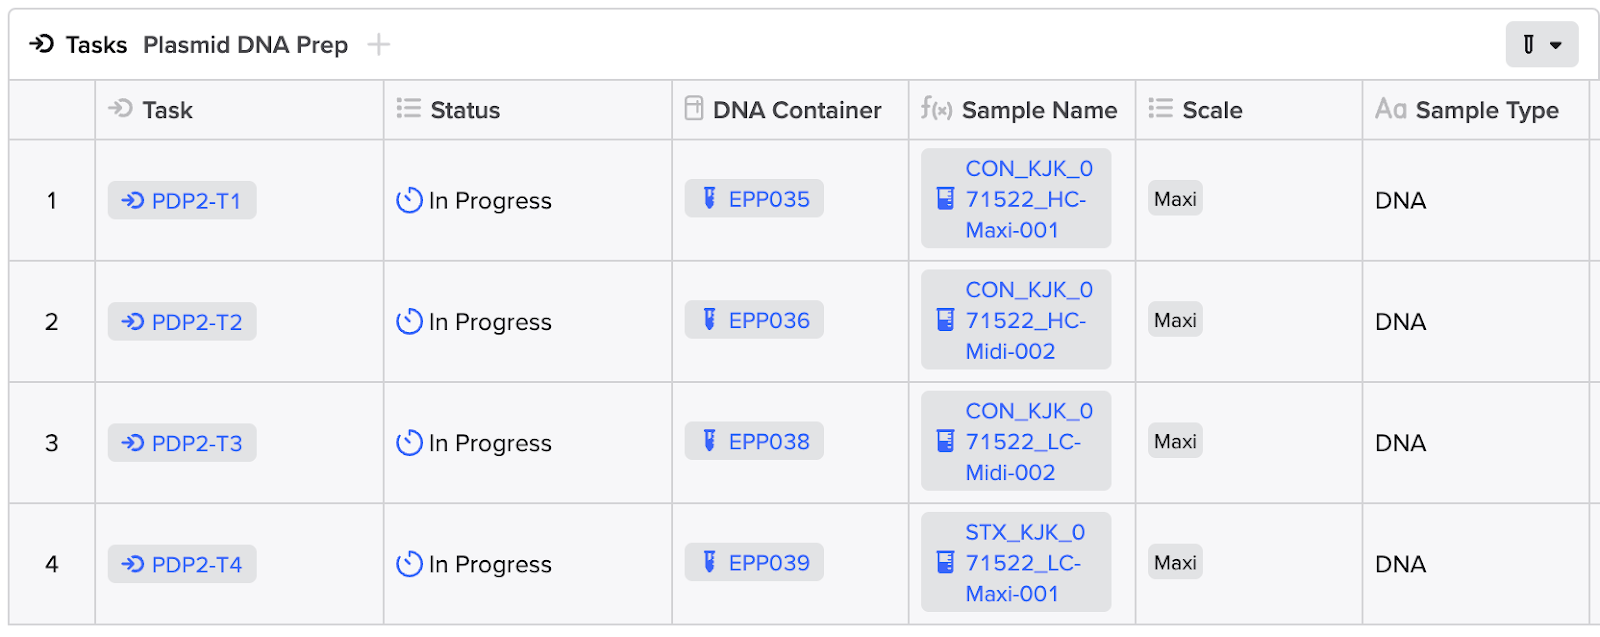
As the vendor updates the status of the fulfillment of the request, the integration would update the status of each Workflow Task to "In Progress" until completion of the order, at which point the integration should update the status to the appropriate end state. Both operations can be completed utilizing the PATCH/workflow-task or the POST/workflow-tasks:bulk-update API endpoint.

Tip: Updating a status in a Workflow Task requires the unique API ID for each status option within your tenant. You can call the GET/workflow-task-schemas/{schema_id} to get this list. Preferentially, you can also map these status options in your App Config (see App Setup).
{
  "statuses": [
    {
      "displayName": "Cancelled",
      "id": "wfts_kKyUECaw",
      "statusType": "CANCELLED"
    },
    {
      "displayName": "Completed",
      "id": "wfts_zy9KI8b2",
      "statusType": "COMPLETED"
    },
    {
      "displayName": "Failed",
      "id": "wfts_pzPri6RD",
      "statusType": "FAILED"
    },
    {
      "displayName": "In Progress",
      "id": "wfts_K5Ss4xwm",
      "statusType": "IN_PROGRESS"
    },
    {
      "displayName": "Invalid",
      "id": "wfts_GltOXUQ9",
      "statusType": "INVALID"
    },
    {
      "displayName": "Pending",
      "id": "wfts_1Ezgw7t4",
      "statusType": "PENDING"
    },
    {
      "displayName": "Planned",
      "id": "wfts_SbKjl77K",
      "statusType": "PENDING"
    }
  ]
}
Surfacing Order Fulfillment Results and Data
Oftentimes, vendor fulfillment of orders are accompanied by Results that should be pushed to Benchling and surfaced in the original request. While the import of these Results can take place in the backend, we will showcase these results directly within the Outputs table of the Workflow Task. Given the limit of 500 rows for structured tables in Benchling, optimized visualization of the Results will depend on the scale.
It is possible to configure Workflow Tasks without Outputs. Generally, if there is a corresponding response that should follow an initial Task creation, it would be appropriate to configure an Outputs table. However, especially in the context of a Workflow Flowchart, there may be instances where a Task creation should immediately proceed to the generation of a subsequent Task to map to an appropriate next step in a given process. In this sort of use case, it would be appropriate to exclude an Outputs table in the initial task. This is why we recommend keying off of the v2.workflowTask.created event rather than the v2.workflowOutput.created event.
Inputs
For this portion of the integration, the results data will be imported on the vendor's initiative and does not require user input.
Processing
The delivery of data back to Benchling will target Benchling Results schemas.
Results Upload
-
After completion of the order, the Results data will need to be structured within a configured Results schema. The Results can then be imported utilizing the POST/assay-results:bulk-create endpoint or processed through a Benchling Connect Run output processor. We recommend consulting with your Benchling Technical Solutions Architect on which route would better suit your needs.
-
The Workflow Task Outputs table can then be configured to surface these Results to the user by configuring a computed snapshot field against the container's content and the specified Result schema.
-
(Optional) Fulfillment of orders may also constitute the creation of entities and containers prior to Results capture. You can utilize the endpoints POST/custom-entities:bulk-create, POST/containers:bulk-create, and POST/containers/{destination_container_id}:transfer to name a few.
-
The status of each Workflow Task is updated with the PATCH/workflow-task or the POST/workflow-tasks:bulk-update API endpoint.
Outputs
Upon completion of the results upload and Workflow Task completion, the user may review the status message and results in the Workflow Task.

App Setup
Permissions
Benchling Apps must be permissioned correctly in order to perform appropriate actions within the platform (e.g. registering an entity or updating a Workflow Task).
-
Ensure that the app is added to the correct Benchling organization.
-
(Optional) ensure that the app is added to appropriate teams within the organization.
-
Ensure that the app is added to projects with an access policy to access the data within. This can be achieved by:
- Adding the organization the app is a member of.
- Adding the team the app is a member of.
- Adding the app directly.
App Configuration
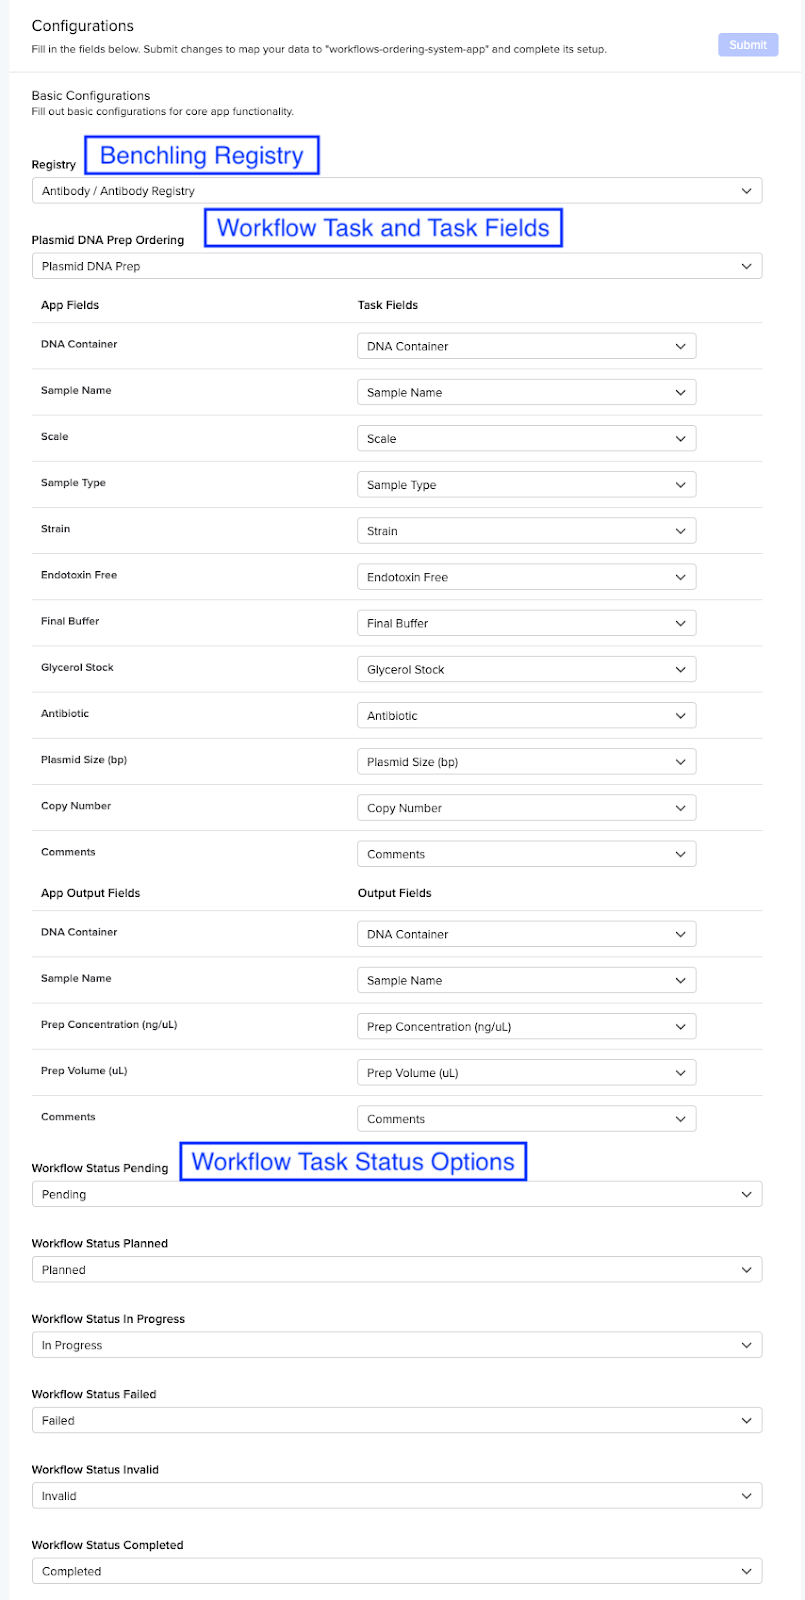
This solution relies on Benchling Apps. Below are some app configuration features that should be leveraged:
-
Registry: Benchling Registry under which all entities, workflows, and results will be created
-
Plasmid DNA Prep Ordering (Workflow): Workflow task from whose creation the order will be submitted to the 3rd party platform text for storing third party credentials such as passwords or API keys
-
Workflow Status: As mentioned earlier, mapping through which Workflow Task status can be updated
-
(Optional) Plasmid Prep (Custom Entity): If order fulfillment constitutes creation of an entity within Benchling
-
(Optional) Plasmid Prep Folder: Permission folder under which the newly created entities will be stored
-
(Optional) New Prep Container: If order fulfillment constitutes creation of a container within Benchling
-
(Optional) Storage Location: Permission location under which the newly created containers will be stored
-
Third party credentials: secure text for storing third party credentials such as passwords or API keys
Example Manifest
manifestVersion: 1
info:
  name: workflows-ordering-system-app
  version: 1.0.0
  description: Template Manifest for Workflows Ordering System App
settings:
  lifecycleManagement: MANUAL
  webhookUrl: https://abcdefg.lambda-url.us-west-2.on.aws/
features:
- name: Ordering System
  id: ordering_system
  type: APP_HOMEPAGE
configuration:
  - name: Registry
    type: registry
  - name: Plasmid DNA Prep Ordering
    type: workflow_task_schema
    fieldDefinitions:
      - name: DNA Container
      - name: Sample Name
      - name: Scale
      - name: Sample Type
      - name: Strain
      - name: Endotoxin Free
      - name: Final Buffer
      - name: Glycerol Stock
      - name: Antibiotic
      - name: Plasmid Size (bp)
      - name: Copy Number
      - name: Comments
    output:
      fieldDefinitions:
        - name: DNA Container
        - name: Sample Name
        - name: Prep Concentration (ng/uL)
        - name: Prep Volume (uL)
        - name: Comments
  - name: Workflow Status Pending
    type: workflow_task_status
  - name: Workflow Status Planned
    type: workflow_task_status
  - name: Workflow Status In Progress
    type: workflow_task_status
  - name: Workflow Status Failed
    type: workflow_task_status
  - name: Workflow Status Invalid
    type: workflow_task_status
  - name: Workflow Status Completed
    type: workflow_task_status
  - name: Plasmid Prep
    type: entity_schema
    subtype: custom_entity
    fieldDefinitions:
      - name: Plasmid
      - name: Prep Date
      - name: Prep Type
  - name: Prep Entity Folder
    type: folder
  - name: New Prep Container
    type: container_schema
  - name: Storage Location
    type: location
  - name: Prep Scale Dropdown
    type: dropdown
    options:
      - name: Mini
      - name: Midi
      - name: Maxi
      - name: Mega
      - name: Giga
  - name: Third party credentials
    type: secure_text
    requiredConfig: true
security:
  publicKey: '-----BEGIN PUBLIC KEY-----key_value-----END PUBLIC KEY-----'
Below is an example of what this might look like in the App Config UI:

Updated about 1 year ago
