

Getting Started with the API
The Benchling API is the most flexible way to build an integration with Benchling. The API provides CRUD (Create Read Update Delete) access to almost all data in Benchling, through REST endpoints that represent that data as JSON.
Take a look at our Tutorial to get started with using the API. This will walk you through getting API access, and making some basic calls.
The API Reference contains a list of all the endpoints we offer, as well as examples for how to call each of them. It also includes an API Explorer, so you can send requests to your own tenant straight from the docs.
Use V3 for new development
This tutorial uses the V3 REST API, Benchling’s recommended API for new development, both in the cURL examples and in the API Explorer walkthrough. V3 has broader coverage than V2, typed filters, batch writes, and field selection. V2 remains fully supported for the endpoints V3 does not cover yet, and both versions accept the same API key or OAuth token. The V2 endpoints are documented in the V2 API Reference.
Building an app or integration?
If you’re looking to create a persistent application on Benchling that integrates Benchling with another system, you should also check out Getting Started with Benchling Apps, as that is the way we recommend developers build long-running applications on the Developer Platform rather than one-off scripts.
The Python SDK
Benchling has a Python SDK that provides helper functions and abstractions for interacting with the APIs! If you’re using Python, we highly recommend using it (rather than rebuilding it yourself with the requests package). Check it out here: Getting Started with the V3 Python SDK. The SDK works with either a user API key or an app’s OAuth credentials, so it can be used any time you’re calling the APIs in Python.
Tutorial
Welcome to the Benchling API! In this tutorial, we’ll walk you through how to access the API and make your first API call to list the DNA sequences you’ve created in Benchling.
Setup
First, we need to get access to the Developer Platform.
If you already have Developer Platform access, open the API section of your user settings page:
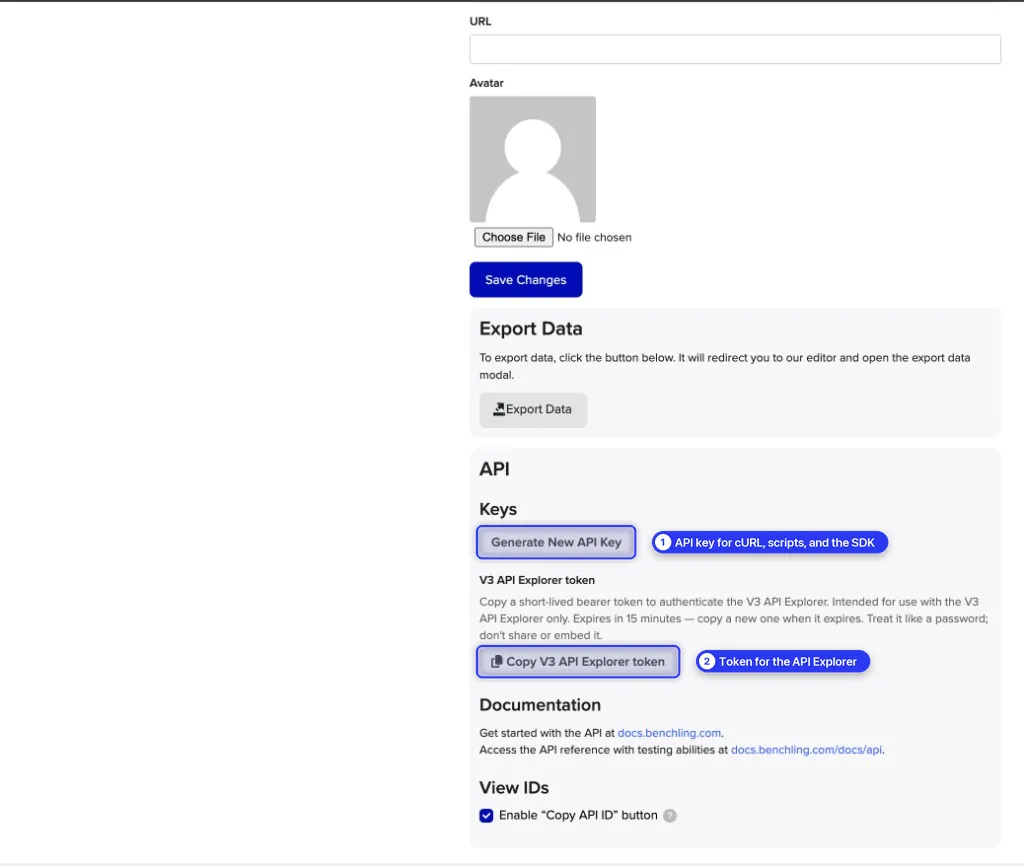
This section has the two credentials you’ll use in this tutorial:
- Generate New API Key creates a personal user API key. Use it to call the API as yourself from
cURL, scripts, or the Python SDK. - Copy V3 API Explorer token copies a short-lived bearer token for the API Explorer in the API Reference. It expires after 15 minutes, so copy a new one when it does. Treat it like a password, and don’t share or embed it.
These are two different credentials — do not mix them up. The API key (prefixed sk_…) is for cURL, scripts, and the SDK. The V3 API Explorer token is only for the interactive Explorer panel in the API Reference. Do not paste your API key into the Explorer’s token field; it will not work.
If your tenant has API key expiration enabled, the API keys table in your user settings includes an Expires At column, and newly created keys display their expiration on the confirmation modal. Keys created before the feature was turned on show Never and remain valid until you rotate or delete them. Rotate expiring keys before the expiration date, or use a Benchling App for long-running integrations to avoid renewals.
The API and Benchling Domains
Your API key is unique for your Benchling domain (sometimes also referred to as your Benchling tenant). When making calls to the API your API key will only be valid for your specific Benchling domain. For example, if your Benchling instance is example.benchling.com (https://example.benchling.com/) and your API key is sk_12345, an example like
needs to be replaced with
before you run the command.
List all DNA sequences
First, we’ll walk you through listing all the DNA sequences you have access to in Benchling using the List DnaSequence items endpoint.
Try it in the API Explorer
The quickest way to explore the API is the API Explorer built into the API Reference. It sends real requests to your tenant using the V3 API Explorer token from your user settings, and produces the same output as calling the API with cURL or your language of choice. That makes it a handy way to debug a request or learn how an endpoint behaves before you write any code.
Before you send a request, two things must be correct:
- Token field — paste your V3 API Explorer token (from user settings) into the token field in the Explorer panel. This is not the same as your API key; do not paste
sk_…here. - Tenant subdomain — the request URL must start with your own tenant’s subdomain (for example
https://example.benchling.com), not the placeholder{tenant_name}.
If the Explorer returns “something went wrong” or a 401, the most likely cause is an expired token — they expire after 15 minutes. Go back to user settings, select Copy V3 API Explorer token, paste the fresh token into the token field, and try again. A second common cause is the wrong subdomain in the URL.
Open the API Reference tab at the top of these docs. The sidebar lists every V3 endpoint, grouped by resource. Endpoint URLs in the reference start with https://{tenant_name}.benchling.com. Replace {tenant_name} with your tenant’s subdomain, for example example for example.benchling.com.
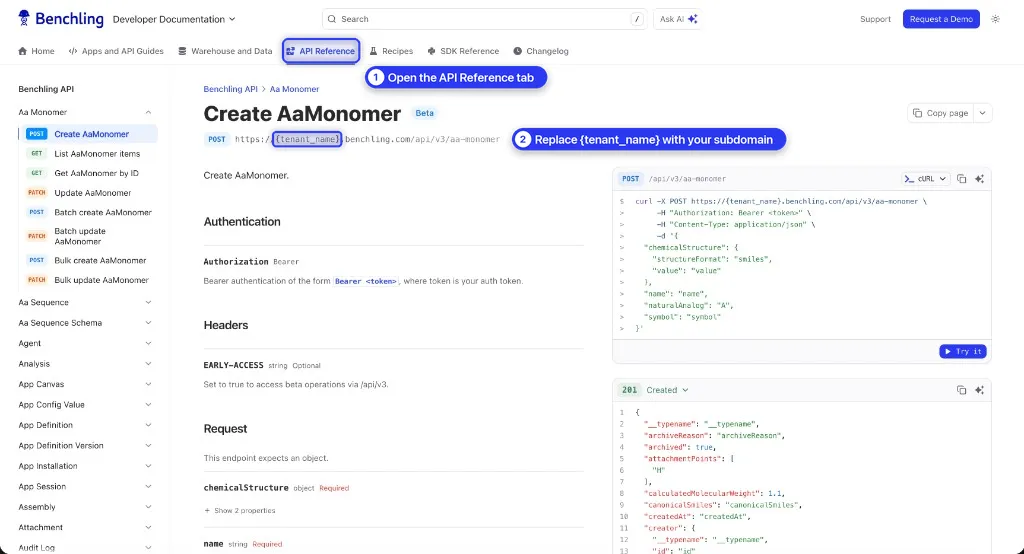
Expand Dna Sequence in the sidebar and select List DnaSequence items, or use the search bar at the top of the page to jump straight to the endpoint you need. The endpoint page lists its query parameters and shows a sample request and response. To start building a request, select Try it under the request sample.
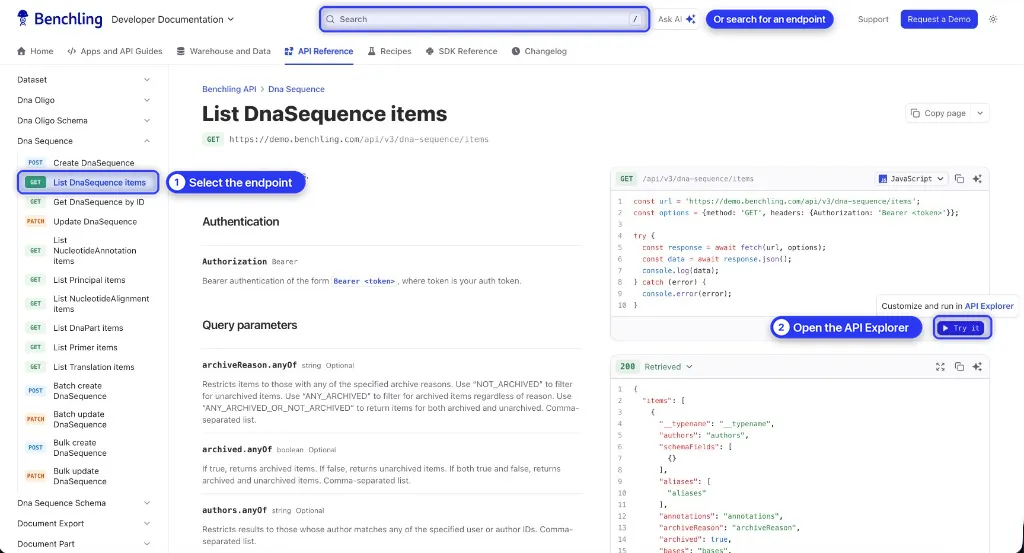
The API Explorer opens with the request URL at the top. Make sure it points at your tenant’s subdomain before you send anything.
Next, authenticate. Go to your user settings, select Copy V3 API Explorer token, then paste the token into the token field in the Explorer. Select Send request to call the API. If you get a 401 response, your token has probably expired, so copy a new one.
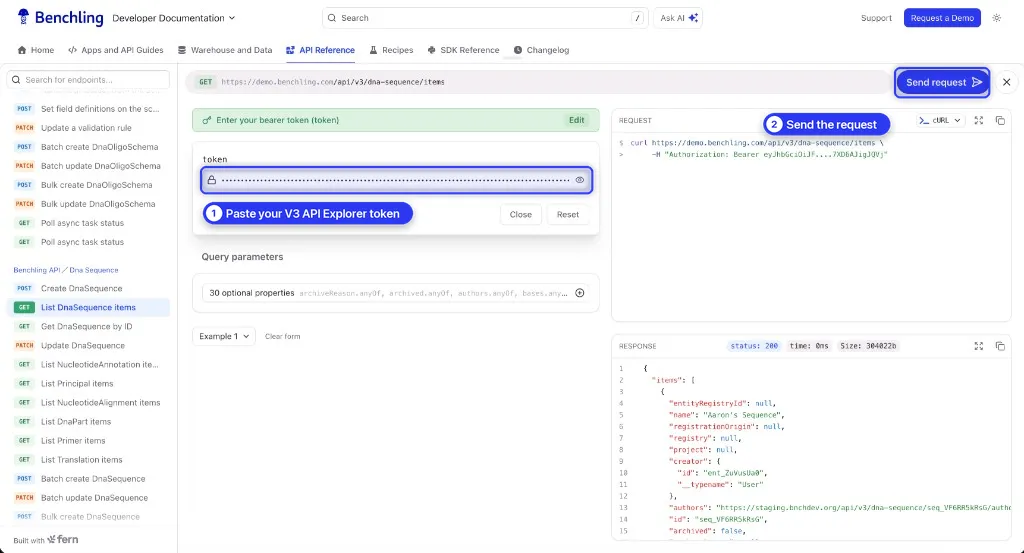
The response panel shows the formatted JSON, along with the status, time, and size. This is live data from your tenant, returned in the items array with a nextToken for fetching the next page. The Request panel shows the equivalent cURL command, which updates as you change the request. That command includes your token, so don’t share it.
Without any parameters, the endpoint returns the first page of sequences you have access to (see pagination). To narrow or reorder the results, select the optional properties list under Query parameters and add the parameters you need:
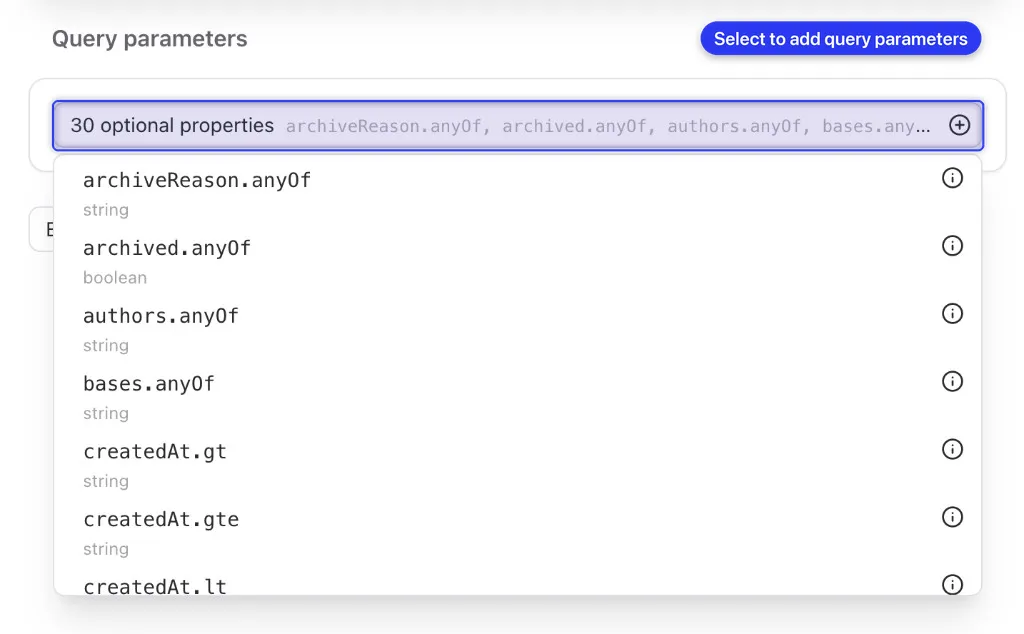
For example, setting pageSize to 50 and sort to modifiedAt:asc returns 50 sequences per page, oldest modification first. The request URL and the cURL command update to match, and Send request runs the new query:
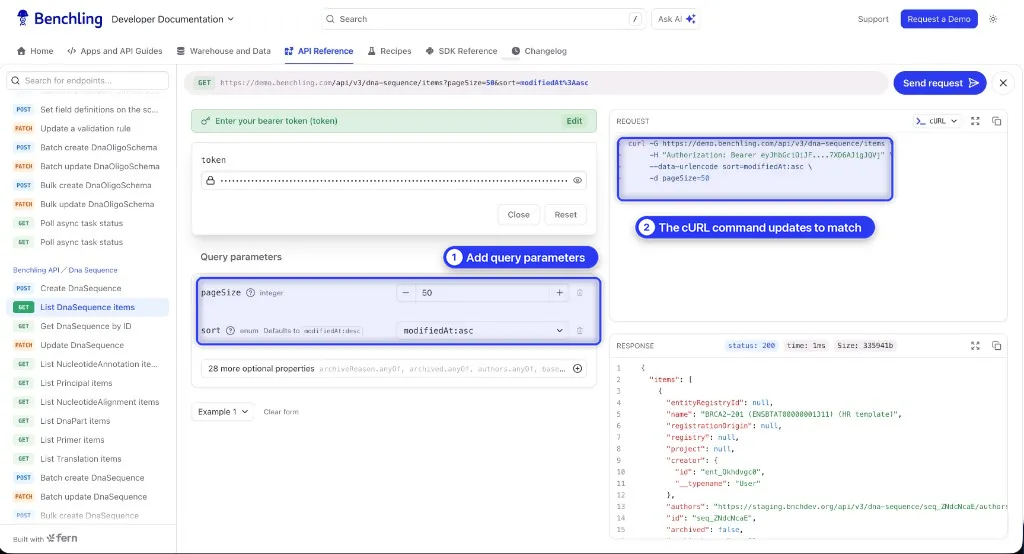
If the query doesn’t return any data, you might need to go create a sequence in Benchling’s UI (or the API) to have data to retrieve.
List all DNA sequences in a project
Now we’ll show you how to use some of the filter parameters using cURL. The List DnaSequence items endpoint has several options for filtering, and one way to filter the results is to only list the DNA sequences in a particular Benchling project. Filtering by project requires multiple steps:
- First, get the ID of your project by listing projects, or by copying it directly from Benchling (see Copy API IDs).
- Then, pass the project ID to the DNA sequence listing endpoint.
First, list the projects:
The endpoint returns a JSON object with an array of projects in the items field. Each project has an id field with an identifier like src_muzHDKze.
Every V3 listing endpoint returns its results in a field named items, plus a nextToken for pagination. V2 names that field after the resource, so projects, dnaSequences, and so on. If you are porting code from V2, this is the change you will hit first.
Then, pass the project ID to the DNA sequence listing endpoint, replacing $YOUR_PROJECT_ID with the ID you got from the previous call:
V3 filters put the operator in the parameter name rather than the value, so projectId becomes project.eq. See Filtering for the other operators.
List registered DNA sequences
If you are using the Registry application, you can use the Benchling API to list all the DNA sequences in your registry that belong to a particular schema. First, make sure that you’ve configured a schema and created and registered a DNA sequence. Then, to filter for registered DNA sequences of that schema, you can pass in two extra filters:
registry.eq, the ID of your registry in Benchling.schema.eq, the ID of your schema.
First, find the ID of your registry:
Each registry in items has an id field with an identifier like src_gfNcj1gd. If there are multiple registries, you can find the one that’s owned by your organization by looking at the owner field.
Then, find your schema’s ID by listing DNA sequence schemas, or by copying it directly from Benchling (see Copy API IDs):
To find your schema’s ID, find the schema with the name you are looking for, and then read its id field, which will look like ts_EM122lfJ.
V2 lists entity schemas per registry, at /api/v2/registries/{registry_id}/entity-schemas. V3 instead gives each entity type its own schema listing, such as /dna-sequence-schema/items, /custom-entity-schema/items, and /aa-sequence-schema/items, which are tenant-wide rather than registry-scoped. Use the one matching the entity type you are about to filter.
Finally, we’re ready to list DNA sequences, using the registry ID ($YOUR_REGISTRY_ID) and schema ID ($YOUR_SCHEMA_ID):
Passing registry.eq=null inverts this and returns unregistered sequences instead.
Diving Deeper into API Resource Descriptions
The objects our endpoints return can be complex and benefit from description at a per-field level. Every endpoint page in the API Reference has a Response section that lists each top-level field in the returned JSON, with its type, whether it can be null, its format, and a description. An example response sits alongside it:
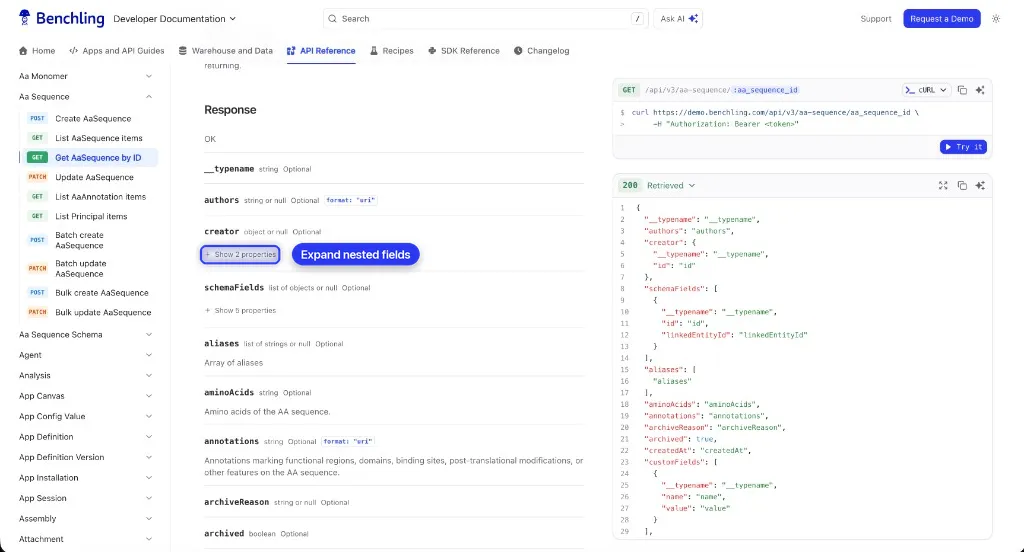
The above example is the Get AaSequence by ID endpoint. Fields that contain nested objects, such as creator and schemaFields, have a Show N properties link that expands their sub-fields and types.
Many of Benchling’s objects can have several layers of nesting, so dive deep whenever you’re looking for detailed information on a specific field!
Copy API IDs
Benchling provides a user setting that makes it easy to copy API IDs from the site. To enable it, navigate to the User Settings page, and you’ll find the setting in the API section.

Once you’ve enabled it, you will be able to copy the API ID of schemas, schema fields, dropdowns, or dropdown options on the page where they are listed:
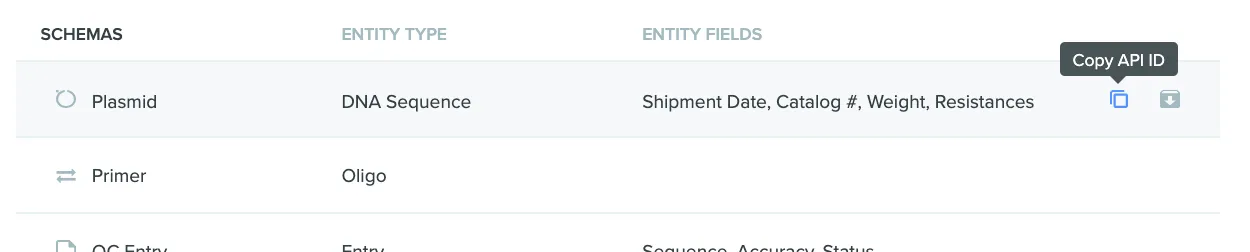
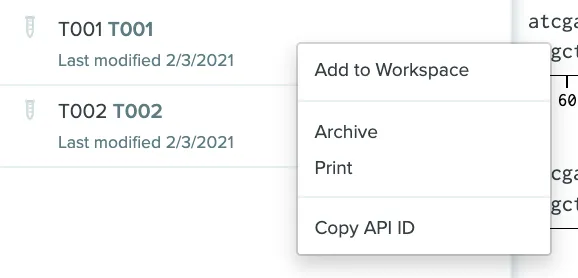
Similarly, you can copy the API ID of entities, inventory, entries, folders, and projects by right-clicking on the row where they are listed.
Returning Query Parameter
Both API versions let you trim the response to the fields you actually need, but they do it differently, so this is one place where you cannot copy a V2 query straight across.
V3: returning and omit
In V3, every listing and get endpoint accepts returning and omit. Both take a comma-separated list of top-level field names, and the two are mutually exclusive:
There is no path syntax and no wildcard, because V3 does not embed child collections in the parent: a plate’s wells is the URI of a nested listing rather than an inline object, so there is nothing to reach into. Fetch children from their own endpoint when you need them.
V2: dotted paths
The V2 returning parameter is implemented on many of the bulk listing endpoints including plates, entries, and entities. It takes a comma-separated list of field paths and will modify the output shape to only include the specified fields. To return all keys at a given level, enumerate them or use the wildcard *.
Responds only with the id, webURL, and creator’s name for each plate object returned as specified by the returning parameter.
Try this out yourself to see the response!
Common questions
Where do I find my API Explorer token?
In your Benchling user settings, open the API section and select Copy V3 API Explorer token. Paste that token into the token field in the Explorer panel — not into a header or URL parameter. The token is different from your API key and is only valid for 15 minutes.
Can I use my API key in the Explorer?
No. The Explorer uses a short-lived bearer token (the V3 API Explorer token from user settings), not your API key. Your API key (prefixed sk_…) is for cURL, scripts, and the Python SDK. Pasting an API key into the Explorer’s token field will not authenticate the request.
Why does the Explorer say 'something went wrong'?
The most common cause is an expired token. Explorer tokens expire after 15 minutes. Go to your user settings, select Copy V3 API Explorer token, paste the fresh token into the token field, and send the request again.
If the error persists after refreshing the token, check that the request URL uses your own tenant’s subdomain (for example https://example.benchling.com), not the placeholder {tenant_name}.
Where is the V2 API?
V2 endpoints are documented in the V2 API Reference and remain fully supported. V3 is recommended for new development because it has broader coverage, typed filters, batch writes, and field selection. Both versions accept the same API key or OAuth token.
More examples
For more examples of how to use the Benchling API, you can take a look at Benchling’s public repository of example integrations or explore more endpoints in the documentation using the same process we stepped through to list DNA sequences.
IDs in the API
There are a few types of identifiers used in Benchling:
- ID
- Registry ID
- Name
- Alias
For developer use cases, we generally recommend using an object’s ID (also referenced as API ID or UUID), as appropriate for the type of object you’re working with. These are guaranteed to be stable identifiers on the tenant.
Registry IDs, Names, and Aliases can often be stable enough for many use cases, but are user-editable or programmatically updated under certain circumstances. We recommend using them with caution as appropriate for your project. See our help documentation for more information on how Registry ID, Name, and Alias can be configured.
Note: All identifiers are scoped to the tenant only, and can conflict across tenants. If you require a universally unique ID when operating across more than one Benchling tenant, you should combine ID with the tenant name.