
Uploading Results to Benchling through the API
Overview
The following example creates results in a demo environment.
There are 4 primary ways to create results via the API:
- Create results
- Create results with a results transaction
- Create up to 4000 results at once using the Bulk API
- This also allows you to add them to a specific results table in a notebook entry, but doing so reduces the limit to 500 results due to the notebook table limit.
- Upload a csv file with results to a Benchling Connect Run and process them
This guide will cover 1, 2, and 3, while 4 requires Benchling Connect and is covered in this separate doc! Note that this doesn't cover all the ways to create results in Benchling, only what's possible through the API.
This example will leverage our interactive API documentation, so make sure you've gone through the Tutorial before proceeding.
Current GapsWe are working on improving the experience of working with results via the API, but want to make users aware of limitations in the mean time. Namely, Results cannot be updated through the API. They must be archived and new ones must be created.
Create Result Schema
To create results in Benchling, there must first be a result schema that defines the structure of the results. Here is a help article that describes the process of creating a result schema in Benchling's UI. Please follow the article for help creating a result schema. We will use the following result schema for these examples, named "qPCR":

Screenshot of the result schema settings page
JSON settings for the fields:
{
    "fields": [
        {
            "displayName": "Sample ID",
            "name": "sample_id",
            "type": "entity_link",
            "isRequired": true,
            "isMulti": false
        },
        {
            "displayName": "CT",
            "name": "ct",
            "type": "float",
            "isRequired": true,
            "isMulti": false
        },
        {
            "displayName": "CT Mean",
            "name": "ct_mean",
            "type": "float",
            "isRequired": false,
            "isMulti": false
        },
        {
            "displayName": "Quantity",
            "name": "quantity",
            "type": "float",
            "isRequired": false,
            "isMulti": false
        },
        {
            "displayName": "Quantity Mean",
            "name": "quantity_mean",
            "type": "float",
            "isRequired": false,
            "isMulti": false
        }
    ]
}
Make sure to also configure your result table so all the columns will appear in the UI:

Result Table Config UI
Get Result Schema API ID
Once you have a result schema created, you can copy the API ID of that result schema from the result schema settings page (if you have copy API IDs setting enabled):

Copy API ID on the row of the Schema Settings page
Our schema id is assaysch_FL4k8H51.
Now that we have our result schema created we can start creating results!
Create Results
This first example will be to create results directly in a single call through our API. We'll be using the POST /assay-results endpoint. To do this, we first must know what we are logging results against.
Get Entity API ID
The result schema we have created has an Entity as the primary key field, meaning that they are meant to be logged against a specific entity. For our purposes, we'll use a simple custom entity as an example:

Custom Entity with schema "qPCR Samples" named "Sample 1"
Again, I can get the API ID from the UI by right clicking and copying it, or by searching for it in the API by using the GET /custom-entities endpoint (or whatever endpoint is appropriate for its schema type) and filtering by name.
Our entity's ID is bfi_ELstHqON.
Get Project ID
We will now choose the project to upload the result to. Typically you will want to choose the same project that the Entity is in from the previous step.
Project ID should almost always be includedOnly users with read access to the
projectIdposted with the result will be able to see the assay result.Leaving project ID empty will result in only the creator of the result having read access.
To retrieve the project ID, you can try a few different approaches:
- Copy it from the UI by right clicking in the project menu and using the Copy API ID option.
- Using the entity ID from the previous step:
a.GETit using that ID from the API.
b. Extract up entity'sfolderIdfrom the returned resource.
c.GETthe folder from the API.
d. Extract theprojectIdfield from the returned resource. - List projects using the available filters to find the desired destination project and extracting the
idfield from the returned resource.
Our desired destination project ID is src_wMsnz0ru.
Create JSON Results
Looking at the example JSON for the create-results endpoint, we have to fill out the following structure:
{
  "assayResults": [
    {
      "fieldValidation": {
        "additionalProp1": {
          "validationComment": "string",
          "validationStatus": "VALID"
        },
        "additionalProp2": {
          "validationComment": "string",
          "validationStatus": "VALID"
        },
        "additionalProp3": {
          "validationComment": "string",
          "validationStatus": "VALID"
        }
      },
      "fields": {},
      "id": "string",
      "projectId": "string",
      "schemaId": "string"
    }
  ]
}
From the schema view, we can see that fieldValidation and id fields are not required, so we will omit them for simplicity. It also indicates that projectId is not required, but since we know we want others to be able to view these results, we must include it.

Note: Always use the reference docs, not this screenshot, for the latest information
Using the result schema ID (assaysch_FL4k8H51), entity ID (bfi_ELstHqON), and project ID (src_wMsnz0ru) that we recorded earlier, as well as these example values for CT, CT Mean, Quantity, and Quantity Mean respectively: 11.115, 11.142, 16.858, 16.568. We can fill out the JSON body of the request! Remember, you must use the name of the field to reference it, not the displayName.
{
  "assayResults": [
    {
      "fields": {
        "sample_id": {"value": "bfi_ELstHqON"},
        "ct": {"value": 11.115},
        "ct_mean": {"value": 11.142},
    		"quantity": {"value": 16.858},
    		"quantity_mean": {"value": 16.568}
    	},
      "schemaId": "assaysch_FL4k8H51",
      "projectId": "src_wMsnz0ru"
    }
  ]
}
You can click on 'Test API' button and post this JSON into the request body (directly in the documentation):

And hit "Execute"! If it goes through successfully, you should get the following response:
{
  "assayResults": [
    "23f5970d-3d05-4779-8418-a070937fe264"
  ],
  "errors": null
}
Once you've uploaded the result, you can view on the "Results" tab of the sample entity in the UI:

Note: The "Reviewed" and "Source" fields are only applicable to results created in Notebook entries.
If you want to aggregate results across several entities or by other fields of the result, you can do so in our Insights product!
Create Results with a Results Transaction
Often times there is a need to create a large amount of results transactionally. This essentially means ensuring all results are either created successfully or fail together.
Creating these results follows the same process as outlined in the above section, but with additional steps to start and commit the transaction. In the above example, instead of directly using the POST /assay-results endpoint, you'll do the following:
- Create a transaction and retrieve the transaction ID
- Create results in the transaction using the transaction ID in the URL. This call can be repeated to add all the necessary results. Note: The structure of the results created in a transaction is exactly the same as the results created directly.
- Commit the results transaction using the transaction ID.
If the commit fails, is aborted, or if a result fails to be created, all results submitted in the transaction fail as well.
Create Results for a Specific Table in the Notebook
Another common use case for creating results is the desire to send them to an existing Results Table in a Notebook entry. You can do this by adding the table's API ID to the JSON you assembled above, and using the POST /assay-results:bulk-create endpoint.
Table ID
The bulk-create endpoint cannot create a new table, so you must first create one with the proper results schema in a Notebook entry. Make sure the person submitting the results via the API has read and write permissions to the entry.
To get the API ID of the results table you want to add to, query the GET /entries/{entry_id} endpoint using the entry ID. You can find the entry ID near the end of the URL for the entry, put together with the entry's name. The end of the URL should look like /etr_abcd1234-my-entry/edit; in that example, the name of the entry is "My Entry", and the API ID is etr_abcd1234.
The entries endpoint will return a JSON representation of the different parts of the entry, and in the list of 'notes', there will be an item whose "type" is "results_table". If you have multiple results tables in the entry, you can look at the column names to help you pick the right one, or look at where the item appears in the list - the note parts are returned in the order they appear in the entry. The ID you want should be under the "apiId" property, and will look like strtbl_aBCdEfgh.
Back in the JSON you're assembling with the results you want to create, add the table ID alongside the results list.
{
  "assayResults": [
    {
      "fields": {
        "sample_id": {"value": "bfi_ELstHqON"},
        "ct": {"value": 11.115},
        "ct_mean": {"value": 11.142},
    		"quantity": {"value": 16.858},
    		"quantity_mean": {"value": 16.568}
    	},
      "schemaId": "assaysch_FL4k8H51",
      "projectId": "src_wMsnz0ru"
    }
  ],
  "tableId": "strbl_aBCdEfgh"
}
Then send this payload to the POST /assay-results:bulk-create endpoint.
Integrating the Results into the Table
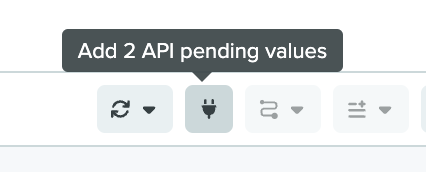
When results are created in this way, they are not immediately appended to the destination table. They are submitted to the registry, but their source is marked as "pending" and they will not appear in the table until they are explicitly integrated. To integrate pending results into a table, click the plug icon in the toolbar of the table, and any pending results will be appended to the bottom of the table, replacing any blank trailing rows. Hovering over the icon without clicking will display a tooltip with the number of pending rows.
Note that if you had the entry open while you submitted the results with the API, you may need to refresh the page for the table to detect the newly pending results.
Next Steps
For more information on results, check out how you can visualize results using our Insights product or how you can upload files containing results via Benchling Connect through our articles on help.benchling.com.
If you created results without attaching them directly to a table in the notebook, you can still visualize the results created via API in a Notebook Entry. Use this help article on lookup tables and columns to see how.
Or, check out more examples for using the Developer Platform here on docs.benchling.com.
Updated over 1 year ago